Working with API
You can automate account and profile manipulations by using API.
E.g., you can create the required number of profiles with the necessary settings (fingerprints, proxy, cookies) without having to open the client, and subsequently use them both in automated and manual mode.
The current API version supports:
- Creating, deleting, and editing profiles, proxies, tags, and folders.
- Importing and exporting profiles and transferring them between accounts.
- Getting a list of available GPUs, screen resolutions, and device models (for Android profiles).
- Managing teams and team members' access rights.
- Working with the Proxy Shop: managing proxy providers and checking your traffic balance.
- Launching profiles for automation using Playwright, Puppeteer/Pyppeteer, Selenium, and CDP.
- Launching one-time profiles, which are created and launched with a single request and are automatically deleted upon closing. This helps streamline automation in cases when you don't need to save such profiles.
A full list of available API features can be accessed here.
More information on RPM/RPH that will be spent when executing a particular request can be found here.
API is available for Base and higher subscription tiers. The RPM/RPH limits depend on your subscription:
| Subscription | RPM | RPH |
|---|---|---|
| Base | 50 | 500 |
| Team | 100 | 1,500 |
| Advanced | 200+ | 3,000+ |
All API tokens in an account share the same request limit. Splitting integrations across different tokens won't increase the limit.
API tokens
You need an API token to use the API. You can create and manage tokens in your account settings, under API Tokens. For subscriptions without API access, this section is disabled.
Only the master account owner can create and manage tokens.
The number of tokens depends on the subscription:
- Base: one token with full rights. It is created with the name "Default" right away; you cannot change the name or permissions of this token;
- Team: up to 3 tokens with different sets of permissions;
- Advanced: Up to 5 tokens with different sets of permissions.
Multiple tokens with different permissions are useful when different integrations or employees need access only to their specific part of the account. The current and maximum number of tokens are displayed next to the section heading, for example, 1 / 5. Once the limit is reached, the Create Token button becomes inactive.
If, after you change your subscription, the number of your tokens exceeds the new token limit, profile launches will be blocked until you delete the excess tokens.
If you've used the API before, your token appears in the list labeled " Default " with full permissions and continues to work as usual. Unlike new tokens, you can view its value in the browser at any time.
The token table displays the token name, its access permissions for profiles and actions, administrative permissions (managing folders, tags, and the team, as well as access to the action log), and the time the token was last used.

Creating a token
- Open your account settings and go to the API tokens section.
- Click Create token. If two-factor authentication is enabled for your account, enter the code from your authenticator app. With the Base subscription, the token will be created immediately; proceed to step 6.
- In the Token name field, enter a name. You can find the token by its name in the action log.
- Configure token permissions (with Team and Advanced subscriptions). By default, all rights are enabled. They mirror team members' rights:
- Access to profiles. To restrict the token to profiles in specific folders, turn off " Access to all profiles " and select the folders;
- Access to actions;
- Folder Management, Tag Management, Team Management, and Action Log.
- Click Create token.
- In the "API Token Created" window, click " Copy " and save the token. Then click "I've saved the token."
The token is displayed only once. If you lose it, you won't be able to use it, but you can generate a new one right away with the same permissions.
For more information about permission categories, see the Team Settings section.
Changing token permissions
With Team and Advanced plans, you can change the permissions and token name at any time: click on the token string, make your changes, and click " Save Changes." The changes take effect immediately, and the token itself remains unchanged. You cannot change the token's name or permissions on the Base subscription.
Generating a new token
If the token is lost or needs to be replaced:
- Click the generation icon in the token row.
- If two-factor authentication is enabled for your account, enter the code from your authenticator app.
- In the "Generate API Token" window, click " Confirm."
- Copy and save the new token.
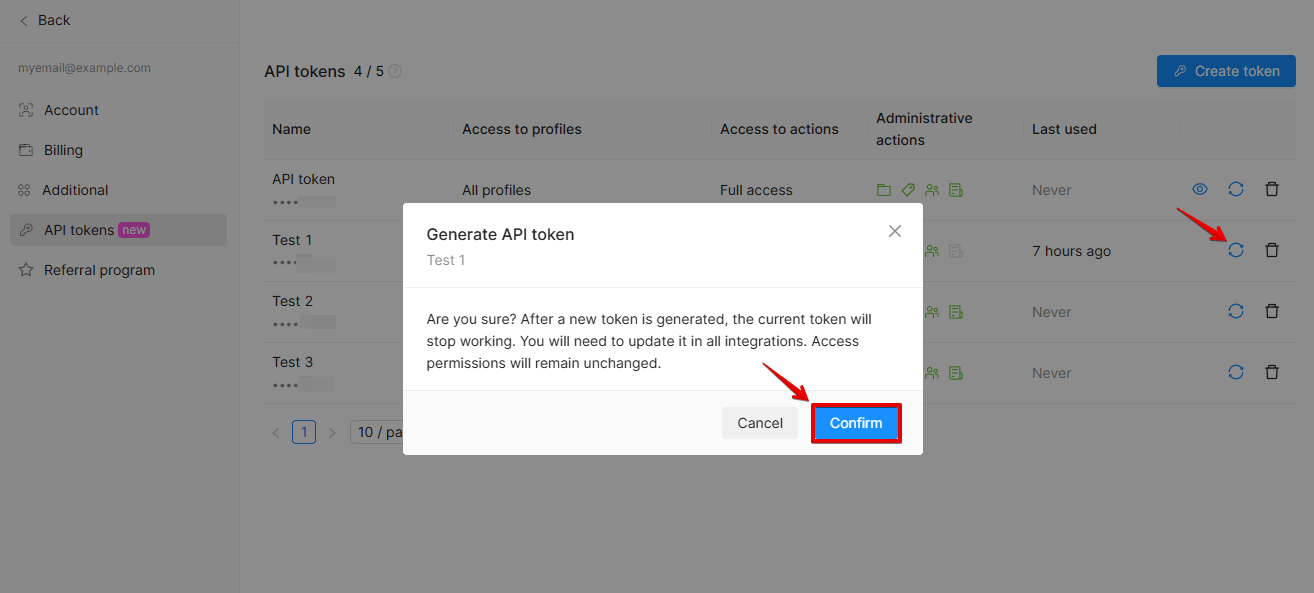
The old token will stop working as soon as the new one is generated. Access rights will remain unchanged. Update the token in all integrations where it was used.
Deleting a token
Click the delete icon in the token row and confirm the action in the "Delete API Token" window. The token will stop working and will be permanently deleted.
Token actions in the action log
All actions performed via the API are recorded in the action log. In the "User" column, the token name is displayed instead of the email address, with the label (API). To view the actions associated with a specific token, select it in the user filter or search for it by name. You can only filter by active tokens: actions performed by deleted tokens remain in the action log, but you cannot select such a token in the filter.
The action log also records the creation, deletion, generation, and editing of tokens. When permissions are changed, the "Details" column displays "Changed access permissions," and when the name is changed, both the old and new names are shown. For more details, please see the Action Log section.